
A clean vaporiser is only ready to use when every part is completely dry. If you use yours daily, brush out the oven after each session, give it a quick clean every few days and deep-clean it weekly. For use once or twice a week, a deep clean every one to two weeks is a practical routine. These vaporizer maintenance tips also cover safe cleaning and careful reassembly.
It’s easy to focus on removing residue and rush the drying stage. But leftover moisture or cleaning solution can affect your next session, so let removable parts dry fully before reassembling the device.
Use these steps to set a cleaning routine, care for different parts, and dry and reassemble your vaporiser safely. The right method depends on your device, so follow its instructions to choose cleaning products and identify which parts can be removed or cleaned.
For Hamilton-specific care notes, read our Hamilton Devices guide to compatibility, charging and cleaning. It covers model identification and care instructions for the Cloak V2 and Tombstone V2.
Key Takeaways
- Set a cleaning routine around how often you use your vaporiser, and clear out the chamber after each session.
- Replace screens when they become clogged or damaged, and mouthpieces if they crack, warp or stain.
- Keep residue and airflow problems in check by avoiding an overpacked chamber and keeping removable parts clean.
- Keep batteries and other electrical components away from cleaning liquids; use methods suited to each part.
- Let every component dry completely before reassembling your vaporiser, so moisture or cleaner residue isn’t trapped inside.
How Often Should You Clean Your Vaporizer?
Set your cleaning routine according to how often you use the device and what you vape. Clear the chamber after each session, and clean it before residue starts to affect flavour or airflow.
Set a Cleaning Schedule
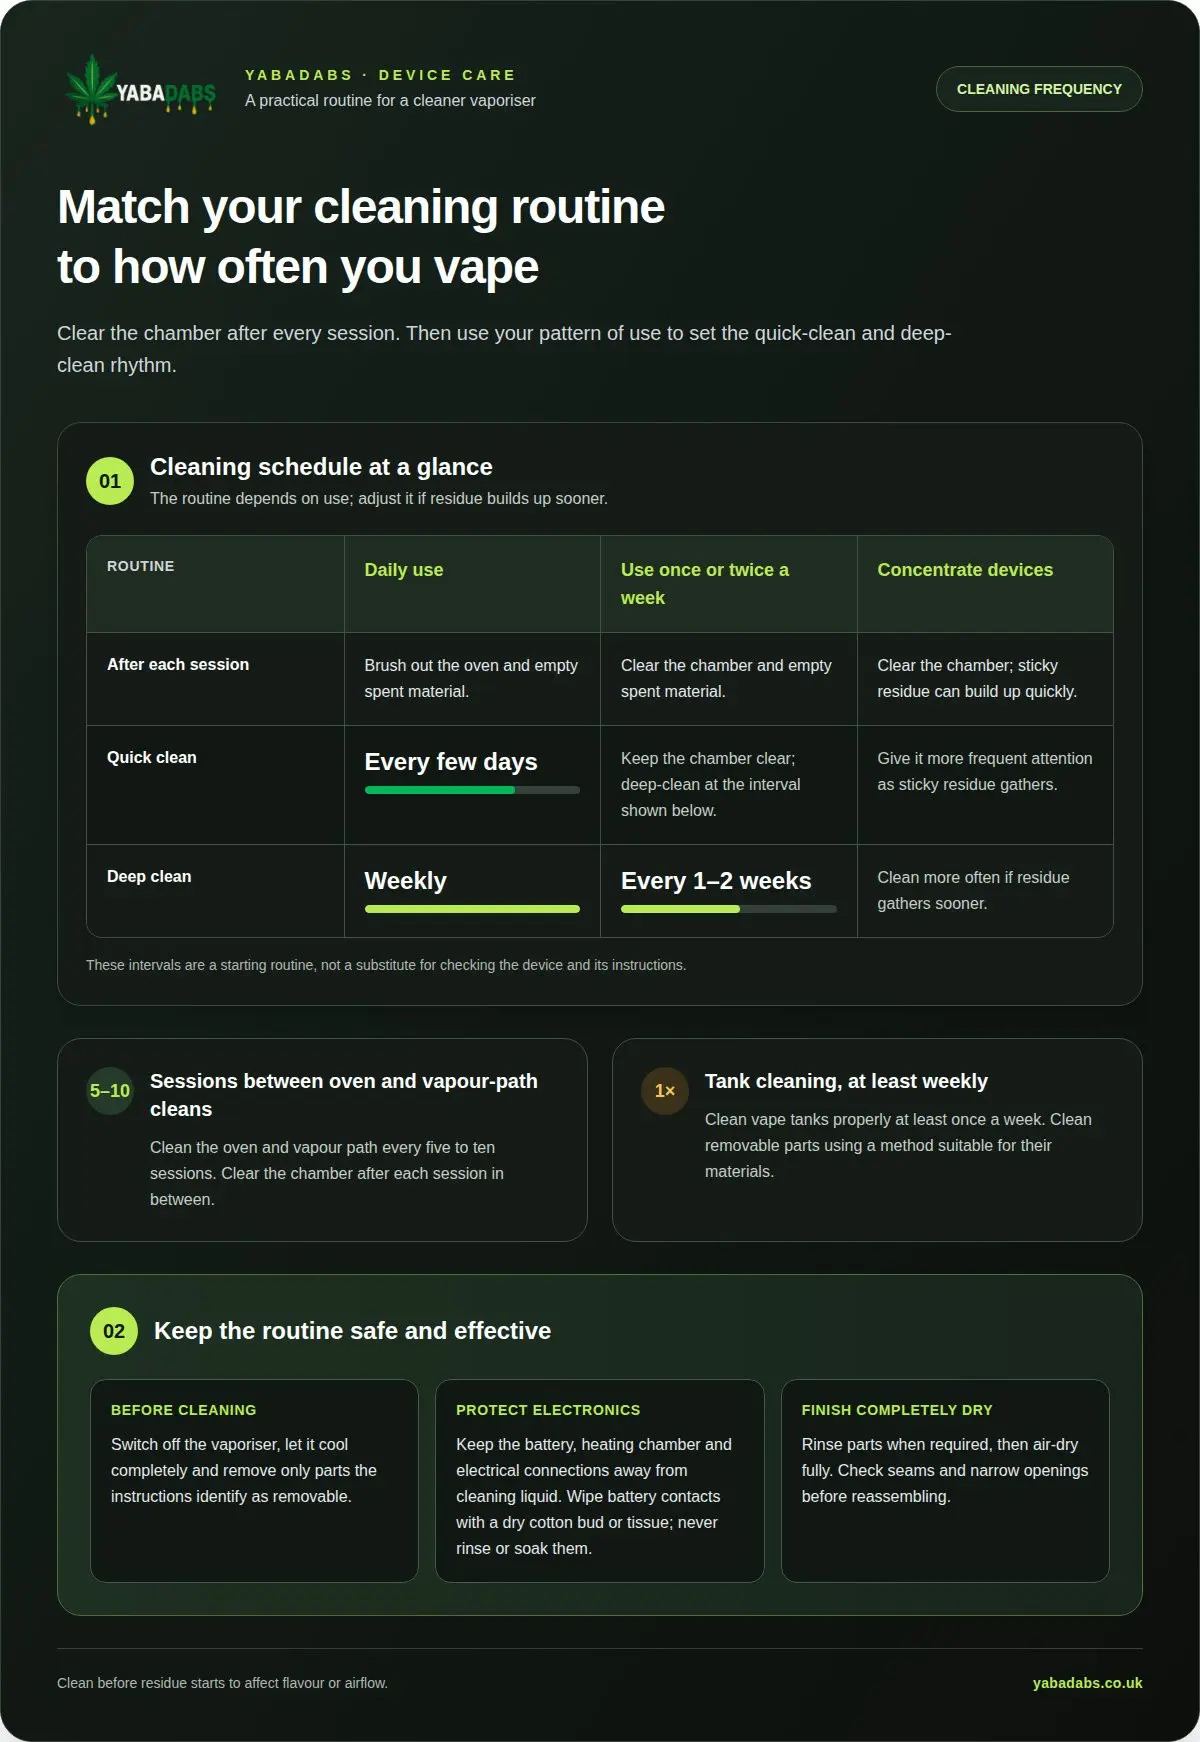
Brush out the oven after every session and empty spent material before residue hardens. Daily users can do a quick clean every few days and a deep clean weekly. If you use a dry herb vaporiser once or twice a week, deep-clean every one to two weeks. Concentrate devices need more frequent attention because sticky residue builds up quickly.
Clean the oven and vapour path every five to ten sessions. Clean vape tanks properly at least once a week. Treat these vaporizer maintenance tips as a starting routine, and adjust if residue gathers sooner.
Clean the Device Components
Switch off the vaporiser, let it cool completely, and remove only the parts its instructions identify as removable. Keep the battery, heating chamber and electrical connections away from cleaning liquid. Wipe battery contacts with a dry cotton bud or tissue; never rinse or soak them.
Use 91-99% isopropyl alcohol only on compatible components. Wear protective gloves because alcohol can irritate skin. It can damage plastic, while acetone can melt plastic. Avoid alcohol on wooden parts, and don’t soak silicone O-rings unless the manufacturer approves it.
Clean the Tank, Coil and Mouthpiece
Clean removable, non-electronic tank and mouthpiece parts using a method suited to their materials. Metal, glass and ceramic pieces can be soaked in isopropyl alcohol for 15-30 minutes, then rinsed with warm water and dried fully. Use a thin pipe cleaner to reach bends without scraping surfaces.
For a coil, follow the device instructions and keep electrical components dry. Don’t assume a coil can be soaked: the materials and construction determine the suitable cleaning method. Check the mouthpiece for residue before refitting it.
- Before starting, gather a soft brush, cotton buds, a thin pipe cleaner and a clean, dry cloth. Brush gently around the oven and vapour path; metal tools can scratch or damage the chamber. If soaking compatible removable parts in alcohol, use a glass container and keep it away from the battery and device.
- Rinse cleaned parts when required to remove cleaning chemicals, then air-dry them completely before vaping. Check seams and narrow openings, where moisture can linger. Don’t reconnect a tank or pod until its contacts are dry. Use a dry cotton bud on battery contacts, not liquid.
- For safe cleaning in the UK, switch off and cool the device, protect your skin from isopropyl alcohol, and keep liquid away from batteries and electronics. Follow the manufacturer’s instructions, ventilate the area and keep alcohol away from heat. These vaporizer maintenance tips help keep cleaning controlled and parts protected.
- Clean a vape tank, coil and mouthpiece by separating only removable parts, cleaning compatible components, then rinsing and drying them before reassembly. Keep the coil and electrical components dry, and use the device instructions to choose the right method. A DynaKit maintenance kit can support routine care when its tools suit your device.
Replacing screens, mouthpieces, batteries and heating elements
Replace a part if it is damaged, worn or no longer fits properly. The right timing depends on the component, device and pattern of use.
Coils often last 5-10 days, depending on use. In the UK, replacement costs depend on the device and part; there isn’t one fixed figure for every model.
Inspect Parts for Wear or Damage
Switch off the device and let it cool before inspecting its parts. Look for a clogged or damaged screen, a cracked or warped mouthpiece, and worn or misshapen seals. Sticky resin that remains after cleaning is another sign that a component may need replacing.
Check coils for visible residue or damage, and note changes in how the device performs. A coil’s lifespan depends on how often it is used, so treat the typical 5-10 days as a guide, not a fixed replacement date. Don’t keep using a visibly damaged part.
Replace Screens, Seals and Mouthpieces
Remove a clogged or damaged screen and fit one designed for the device. A clean screen helps keep the air path open; don’t force it into place if it sits unevenly. Check gaskets and seals for tears, distortion or a poor fit, since damage can leave parts loose.
Replace mouthpieces that are cracked, warped or stained. Match the replacement to the device and seat it securely without forcing the connection. After fitting each part, check that it sits evenly and doesn’t move freely. Replace worn parts rather than relying on a temporary fix.
Replace Coils and Heating Elements
Follow the manufacturer’s instructions when replacing a coil or heating element. Let the device cool, remove the old part as directed, and avoid pulling on wires or nearby connections. Fit the new component securely, but don’t overtighten it.
Some pod cartridges may need replacement after 2-3 weeks if cracked, leaking or fitting poorly. A drip tip may need replacing after 1-2 months if it is discoloured, fits badly or raises hygiene concerns. These timeframes are guides; visible damage and fit are useful signs to act sooner.
Replace and Care for Rechargeable Batteries
Replace a rechargeable 18650 lithium-ion battery after approximately 300 charge cycles or approximately eighteen months. Replace built-in batteries when they no longer hold a charge. Stop using a battery that appears damaged, and keep the battery connection clean and dry.
Use the device’s original charging cable and adapter. Store the vaporiser in a clean, dry place away from extreme heat and direct sunlight. Freezing temperatures can cause condensation that may damage electronics. If choosing a compatible replacement, browse replacement battery options and match the battery type to your device.
Vape Maintenance Tips: How To Keep Your Vape in Good Condition?
For a dry herb vaporiser, switch it off, empty the chamber, brush out residue and clean compatible removable parts. Let everything dry completely before reassembly. If you notice a problem, check the airflow, battery, seals and coil before using the device again.
Prevent Residue and Airflow Problems
Empty the chamber after each session, and don’t reload it over leftover or partly vaped flower. Brush the oven after use: compacted material can restrict airflow and make residue harder to remove. Pack the chamber loosely enough for air to pass through. Overpacking can obstruct the air path and leave extra mess.
For concentrate devices, gently warm the device to soften sticky residue before cleaning, if its instructions allow it. Keep a vape upright in a pocket or bag to help limit leaks. E-liquid left in a tank for more than about a day can noticeably affect its taste.
Clean a Dry Herb Vaporizer
Switch off the vaporiser and let it cool. Empty the chamber, then use a soft brush to clear loose material from the oven and vapour path. Take apart only removable components, keeping the battery and electrical parts away from cleaning liquid.
Clean compatible metal, glass or ceramic pieces using a method suited to their material. Use a thin pipe cleaner for a narrow bend, and rinse parts if the cleaning method requires it. Don’t scrape the chamber with metal or use alcohol on plastic or wood. Dry every component before reassembly.
Maintain Tank Seals and Airflow
Check the tank, pod and seals for residue, leaks or a loose fit. Clean the pod or tank weekly, and keep liquid away from electrical connections. A damaged or poorly seated seal can allow liquid to escape. Replace worn seals rather than forcing the tank into place.
After rinsing a tank or pod, leave it to dry completely, ideally overnight, before refilling. Don’t soak rubber or silicone seals in cleaning liquid for 30 minutes. If airflow feels restricted, check the tank opening and mouthpiece for residue instead of pushing a tool through forcefully.
Troubleshoot Common Vaporizer Problems
If vapour seems weak, check the battery charge, airflow openings and chamber packing. Remove residue blocking the air path, and avoid filling the chamber too tightly. For a vape with a wick, allow it to re-saturate between puffs to help prevent coil overheating and wear.
If a tank leaks, check its seals and fit, and store it upright. If the flavour turns stale, replace e-liquid left in the tank for more than about a day, then clean and dry the tank before refilling. If the heating element still performs poorly, follow the manufacturer’s instructions.
Why regular vaporizer maintenance matters
Regular care helps preserve flavour, airflow and reliable operation. A few simple checks also make it easier to spot worn parts before they affect a session.
- Keep a simple maintenance routine to limit residue in the oven and vapour path. As residue builds up, airflow can become restricted and flavour can turn stale. Clearing it regularly helps keep draws smooth and makes changes in performance easier to notice.
- Pay attention to flavour while vaping. A burnt or muted taste can point to residue, old material or a part that needs attention. Check the mouthpiece and air path for visible build-up, then clean or replace the affected component according to the device instructions.
- Inspect the mouthpiece and screen as part of routine care. These parts sit directly in the vapour path, so residue or damage can affect your session. A quick visual check may reveal a cracked mouthpiece or clogged screen before airflow noticeably changes.
- Keep connections and removable components in good condition. A loose-fitting part can disrupt the device’s intended airflow, while residue around a connection can make a secure fit harder to maintain. Check how components sit after cleaning, and replace parts that remain worn or damaged.
- Use regular care to help avoid premature part replacement. Routine maintenance of a dry herb vaporiser could reduce replacement-part costs by up to 50%. That figure isn’t a saving to count on for every device, but it shows why cleaning and timely attention to wear can matter over time.
- Make each check purposeful: look for residue, damage, poor fit and changes in flavour. Use a cotton swab on accessible areas only if the device instructions allow it, and keep electrical parts dry. A clean, dry mouthpiece and clear vapour path help support a smoother session.
- Note changes you notice, such as weaker airflow after a session or a mouthpiece that no longer fits securely. Comparing these observations over time can help you distinguish a cleaning issue from a worn part. Follow the manufacturer’s instructions before replacing any component.
Drying and reassembling the device
Drying completes the cleaning process, so don’t rush it. Moisture or cleaning solution can remain in seams, the chamber or removable parts. Inspect each component before reassembling the device.
Dry the Device
Place each washed, removable component on a clean, dry towel. Leave space between parts so air can circulate around the chamber, screen and mouthpiece. Air-dry them for a few hours, then check joins and recessed areas for moisture before handling them further.
- Keep the battery, charger and other electronic components separate from washed parts. Never rinse an electronic section or put it in cleaning solution. If liquid reaches an electrical connection, don’t reconnect or charge the device while it is wet.
- Give vape tanks and pods extra drying time after rinsing. Let them dry completely, ideally overnight, before refilling. Check inside the tank and around its openings: a dry exterior doesn’t show whether moisture remains inside.
- Check for cleaning solution as well as water. Rinse parts that require it according to the cleaning instructions, then dry them again on the towel. Don’t use the device if you can still smell cleaning solution or see dampness in a narrow opening.
Reassemble the Device
Use the device instructions to return each dry component to its proper position. Fit screens, seals and the mouthpiece without forcing them. Check that the chamber closes correctly and removable parts sit evenly, with no gaps or loose connections.
- Reconnect the tank or pod only after its contact points are dry. Keep the battery away from cleaning liquid, and make sure no cotton fibres or debris remain on the connection. Clean, dry contacts support a secure fit without introducing moisture into the electronic section.
- For a dry herb vaporiser cleaned with isopropyl alcohol, run an empty heating cycle at maximum temperature for 3-5 minutes after reassembly. Don’t inhale during this burn-off. Follow the device instructions if they describe a different post-cleaning procedure.
- Before the next session, check the assembled device once more. Confirm the chamber is empty, parts are seated, and no moisture or cleaning solution remains. Careful drying and fitting help prevent trapped liquid, blocked openings and a poor connection. Explore vaporiser options if you’re considering a different device.
yabaDABS
yabaDABS offers vaporizers from Hamilton Devices, XVAPE and XMAX, alongside smoking accessories and glassware. If your current device is difficult to clean or its parts no longer fit well, comparing other options may help you find a better match for your routine. Choose a vaporizer suited to how you use it, then follow its care instructions to keep removable parts clean and dry. The right accessories can also make upkeep straightforward, from storing components neatly to keeping your setup organised. Explore yabaDABS’ vaporizers and accessories, and contact the team for help choosing a device.
Keep your next session on track
Make care part of your routine rather than waiting until flavour fades. Keep a simple note of cleaning and part changes, and follow the instructions for your specific device. These vaporizer maintenance tips are a useful starting point; the device’s own guidance should shape each cleaning and replacement decision.
If you’re considering a different setup, yabaDABS offers premium e-rigs, portable devices and Hamilton Devices vaporizers. Explore the available options and choose what fits your preferences and routine. For a straightforward next step, contact yabaDABS about vaporizer options. A considered choice and consistent care can help make every session feel easier to manage.
Frequently Asked Questions
How to Clean the Mouthpiece?
Remove the mouthpiece if the device instructions allow it, then clean it according to its material. For a compatible removable glass, metal or ceramic mouthpiece, use the recommended cleaning method and rinse away any solution. A soft brush or cotton bud can help remove residue around narrow openings. Let the mouthpiece dry completely before refitting it, and replace it if it’s cracked, warped or stained.
What About Wax or Concentrate Vapes?
Clean concentrate devices more frequently because sticky residue can quickly collect around the chamber and vapour path. Switch the device off and let it cool before removing compatible parts. If the manufacturer’s instructions allow it, gentle warming can soften residue before cleaning. Keep the battery and electrical connections dry, and use cleaning products only on parts that can tolerate them.
What’s the best way to clean resin out of a vape?
Switch off the device and let it cool. Remove only the parts the manufacturer identifies as removable, then use a soft brush or suitable pipe cleaner to lift loose resin from accessible areas. For compatible glass, metal or ceramic parts, follow the device’s cleaning instructions and rinse if required. Avoid scraping the chamber with metal tools, which can damage its surface.
Which solution do I use?
Use the cleaning solution recommended for your device and its component materials. Isopropyl alcohol at 91-99% is commonly recommended for compatible dry herb vaporiser parts, but it can damage plastics and should not be used on wooden components. Keep it away from batteries and electronics, and wear protective gloves because it can irritate skin. Don’t mix cleaning products or use a solution the device instructions prohibit.
How often should you clean a vaporizer?
Let usage guide your routine. Daily users can brush the oven after each session, do a quick clean every few days and deep-clean weekly. If you use a dry herb vaporiser once or twice a week, a deeper clean every one to two weeks is a practical guide. Clean a vape tank weekly, and clean sooner if residue or stale flavour appears.
Which cleaning products are safe for vaporizers?
Choose cleaning products according to the device instructions and the material. A soft brush, cotton bud and thin pipe cleaner can remove loose residue without harsh scraping. Isopropyl alcohol suits some compatible removable parts, but can damage plastic and wood. Keep liquids away from batteries and electronic components, and rinse cleaned parts when required to remove lingering solution.
How can you prevent residue buildup and clogged airflow?
Empty the chamber after each session, brush out loose material and avoid packing it too tightly. Overpacking can restrict airflow and leave more residue behind. For a vape tank, keep its openings clear and store it upright to help reduce leaks. Allow a wick to re-saturate between puffs, and clean the device when residue starts affecting the draw or flavour.
Disclaimer
Articles on yabaDABS are for general information only and do not constitute medical or legal advice. Products are intended for adults aged 18 and over and lawful use only. Follow the manufacturer’s instructions and check the laws that apply where you live. Consult a qualified healthcare professional before using CBD or other cannabinoid products, particularly if you take medication. Prices, specifications and availability may change; check the product listing before ordering.